
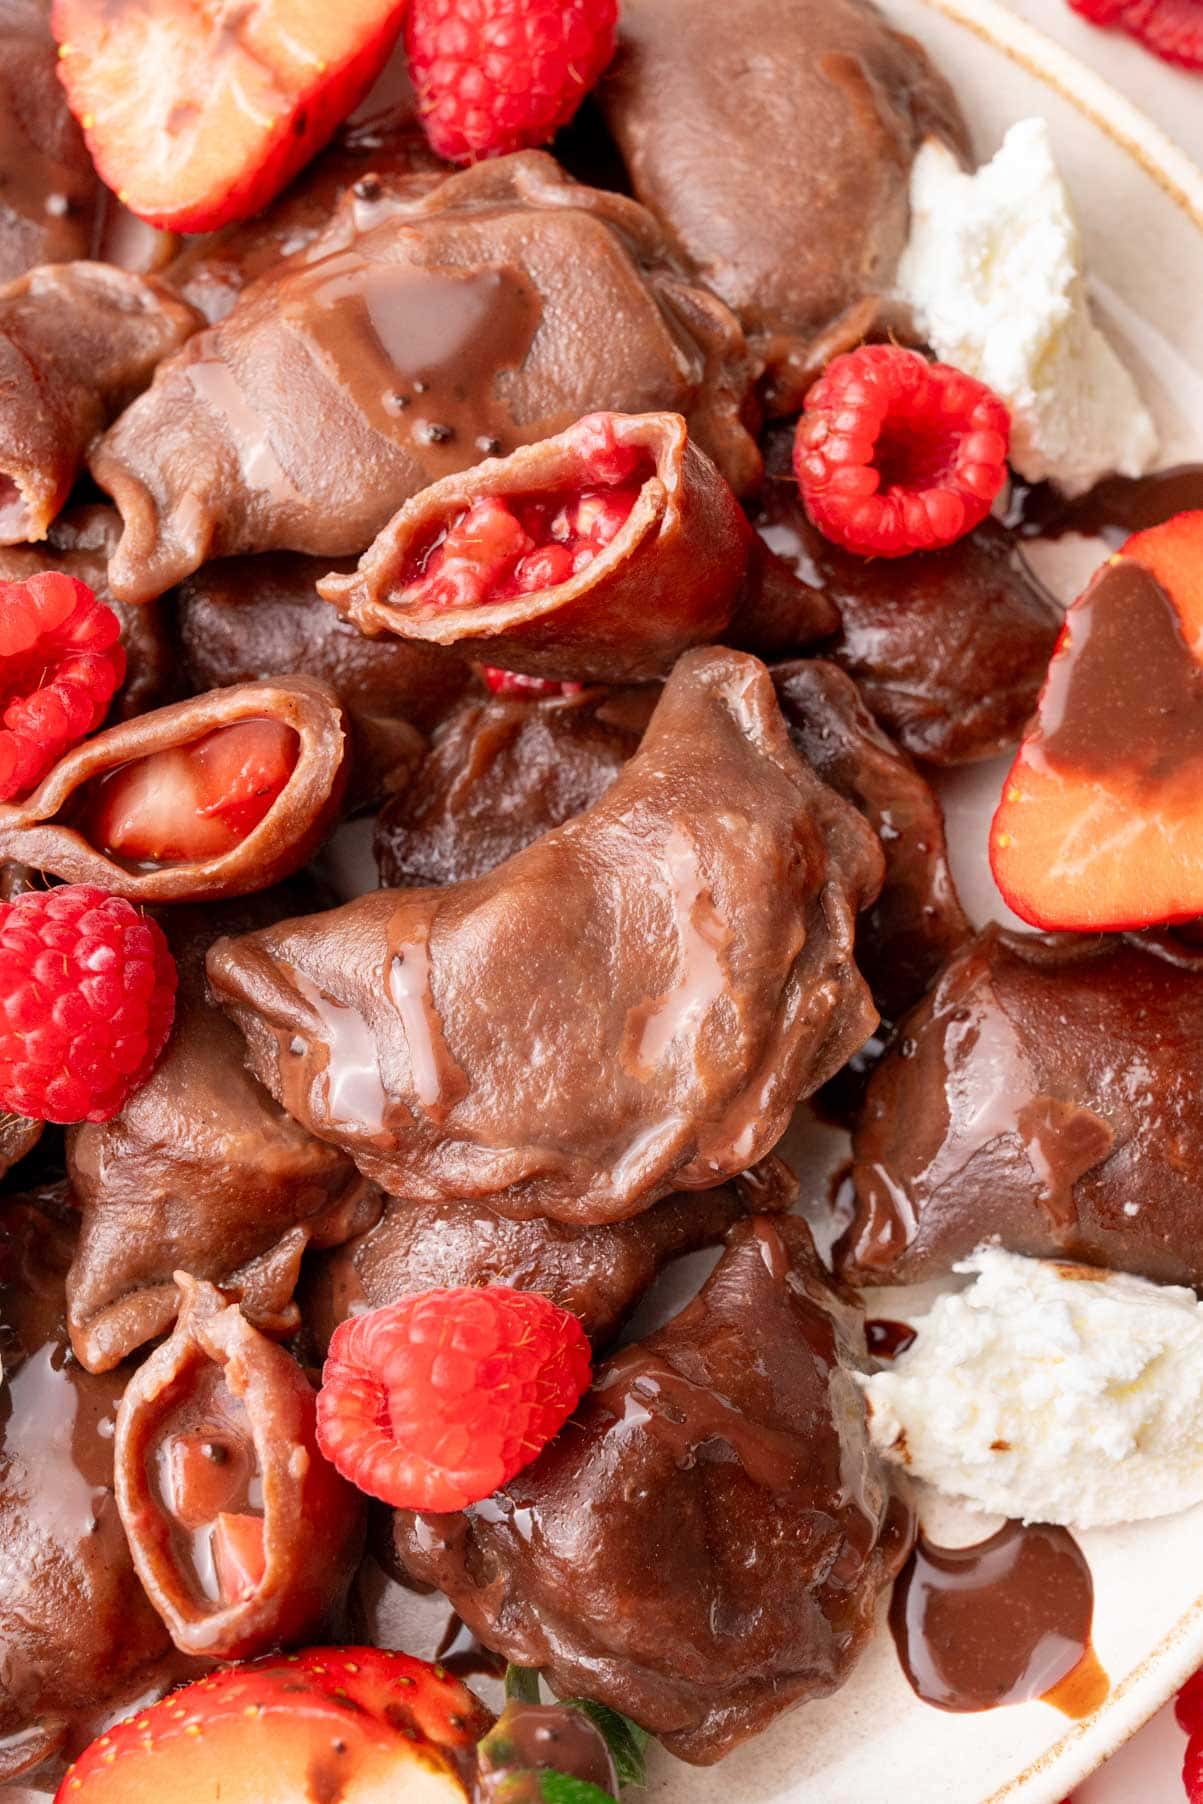
Chocolate pierogi are a delicious twist on traditional Polish dumplings! Made with soft, cocoa-flavored dough and filled with juicy strawberries and raspberries, they make a perfect dessert for Valentine’s Day or any other special occasion. They taste amazing on their own or even better with chocolate sauce and whipped cream.
Dessert Pierogi
Pierogi don’t have to be savory! Dessert pierogi are actually very popular in Poland, especially in the summertime. Traditional sweet pierogi varieties include sweet cheese pierogi, filled with sweet farmer’s cheese, and fruit pierogi, made with seasonal fruits like strawberries, blueberries, raspberries, or cherries.
This chocolate pierogi dough recipe isn’t a widely known traditional version, but some people make them, and you can definitely find them in pierogi restaurants (Pierogarnie), where a wide variety of pierogi types and fillings are offered.
See all our pierogi filling recipes and sauces and toppings for pierogi!
Ingredients
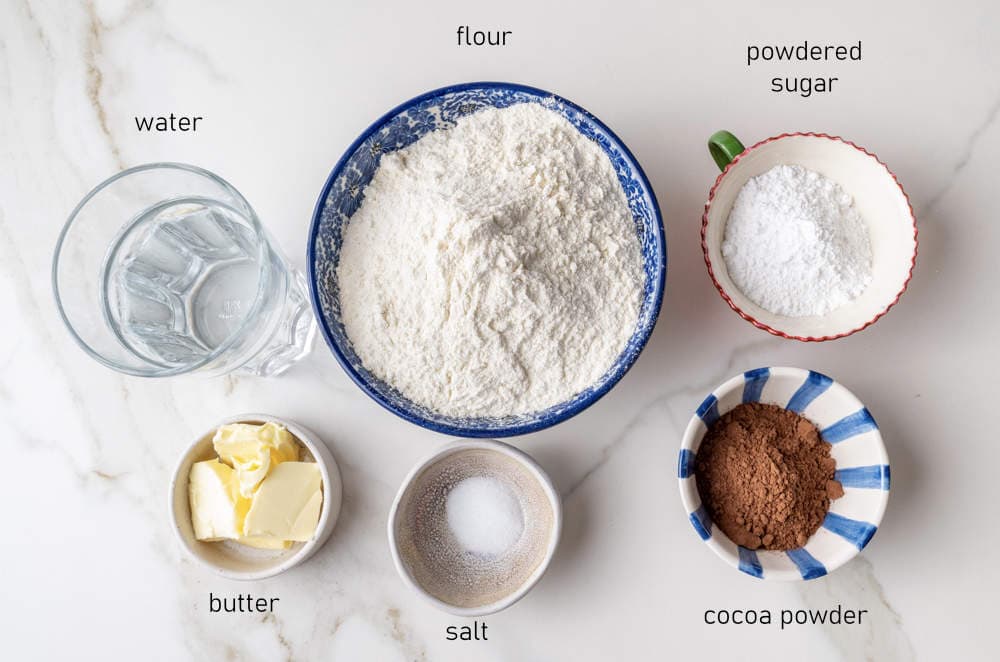
Here’s what you need to make this recipe:
This is a modified version of my popular pierogi dough recipe. The proportions are essentially the same, but I swapped some of the flour for cocoa powder and powdered sugar to create a chocolate dessert version.

I made these pierogi with three types of filling:
- Strawberry filling – made with fresh strawberries, sugar, cornstarch, and vanilla.
- Raspberry filling – made with fresh raspberries, sugar, cornstarch, and vanilla.
- Raspberry and cheese filling (my favorite!) – made with fresh raspberries, farmer’s cheese, and sugar.
You can’t use frozen fruit – it’s too watery.
If you want even more chocolate flavor, you can fill these pierogi with chocolate hazelnut spread like Nutella or a similar alternative. Just make sure the filling isn’t too runny, or it will be difficult to seal the pierogi properly. I wouldn’t make all the pierogi with a chocolate filling, as they might be too rich and heavy. However, a mix of chocolate-filled and fruit-filled pierogi is a great idea! This way, you get a nice balance of flavors and textures, making this dessert even more enjoyable.
How to make it step-by-step
Before you start: How to measure flour: I’m using the “spoon and level method” so 1 cup of flour in my recipes weighs 125g. Fluff the flour by stirring it in the bag/flour container with a spoon. Spoon the flour and sprinkle it into your measuring cup. Sweep off the excess flour with the back of a knife. I recommend using a digital scale for perfect and consistent results.
Make the dough:
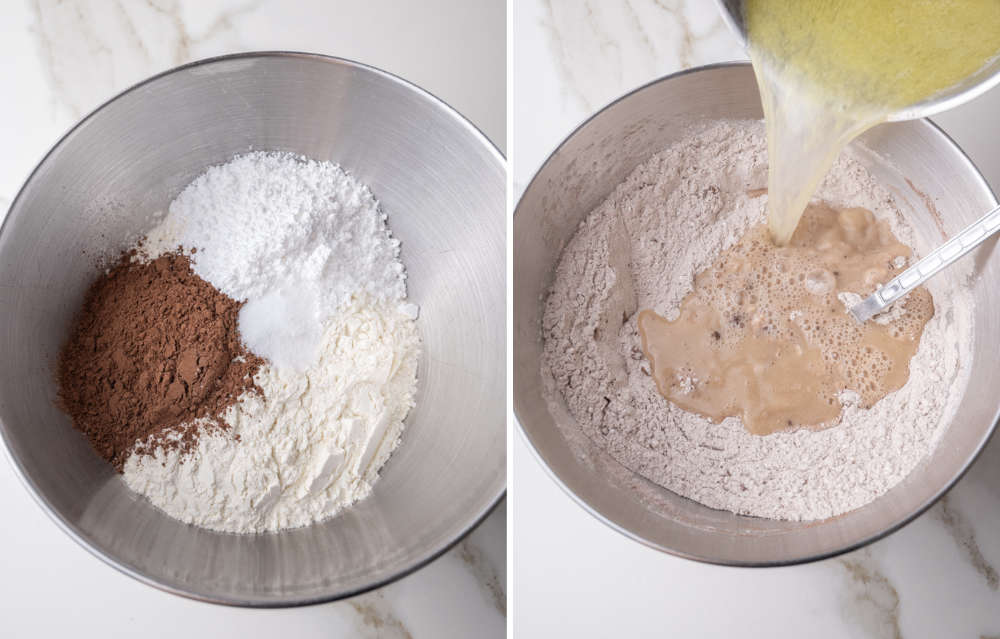
Add the flour, powdered sugar, cocoa powder, and salt to a large mixing bowl and stir them together.
In a small saucepan, warm the water with butter until they are very warm but not boiling (temperature should be around 176°F/80°C, that is when the water starts to move and steam).
Pour hot water with butter into the bowl with flour.
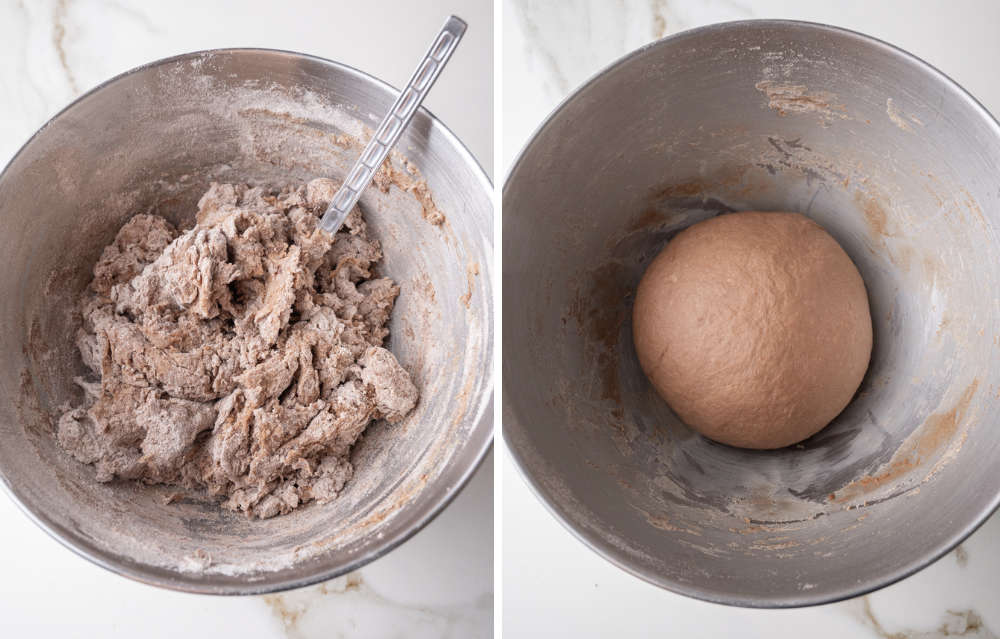
Mix with a wooden spoon until roughly combined.
Knead the dough by hand or using a stand mixer fitted with a dough hook for about 5 minutes. You can also use a food processor with a dough blade. The dough should be smooth, soft, and not sticky—it will become even softer after resting.
If you follow the recipe closely, especially if you weigh the ingredients instead of using measuring cups, the dough should turn out just right. However, if it feels too dry, add a little water; if it’s too wet, add a bit of flour until you reach the perfect consistency.
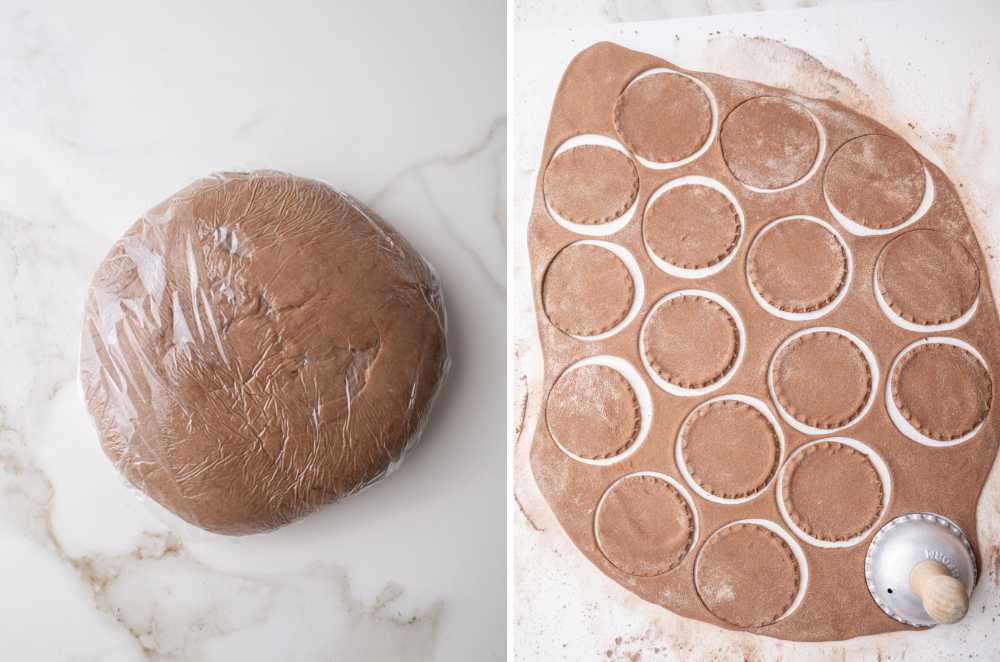
Wrap the dough in plastic foil and leave to rest for about 40 minutes (don’t omit this step).
In the meantime, you can wash the fruit and pat it dry with paper towels but don’t prepare the filling just yet – the sugar will start extracting water from the fruit, the fruit will get watery, and it will be difficult to stuff pierogi with watery filling!
Roll out the dough and cut out rounds
Divide the dough into 3 parts.
Onto a lightly floured surface or silicone rolling mat (you can also use a mix of flour and cocoa powder to roll the dough out), roll out thinly the first piece of the dough, to a thickness of approx. 1/8 inch or 3mm (or as thinly as you like).
Use a cup or a pierogi/pastry cutter to cut out rounds.
Gather scraps, cover with plastic wrap, and set aside (I like to roll out the main parts of the dough by hand, using a rolling pin, and the scraps, which are harder to roll out, using pasta attachment on my kitchen aid, I’m using the setting 3).
Make the filling
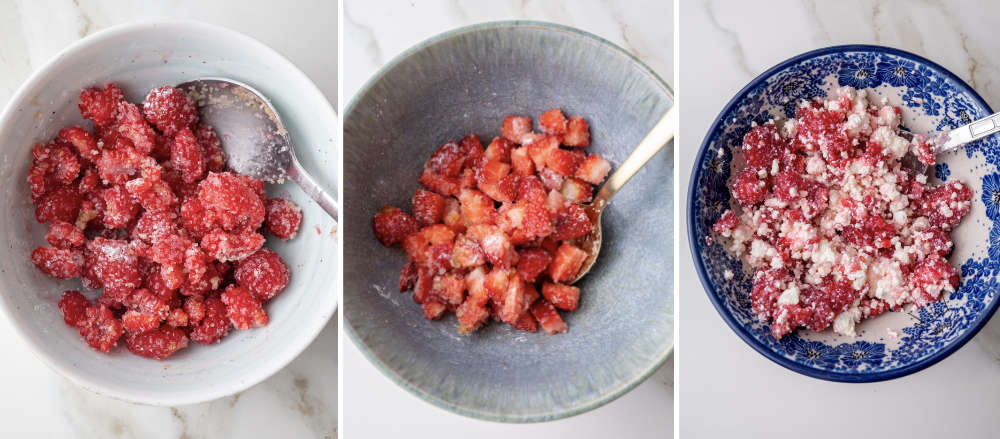
Make the filling: now you should make the filling, but don’t make all of the filling right away, the fruit starts to get watery really quickly.
I like to quickly stir together 1 cup of fruit (halved raspberries or chopped strawberries) + 2 tablespoons sugar + 1 teaspoon of corn starch + ½ teaspoon of vanilla extract. I make more filling as I go and fill the pierogi. As for the raspberry and cheese filling, I like to make it in 3 batches, using 1 cup of raspberries, ¾ cup of crumbled farmer’s cheese, and ¼ cup of sugar. Then I make more when my pierogi are filled.
Filling and shaping pierogi
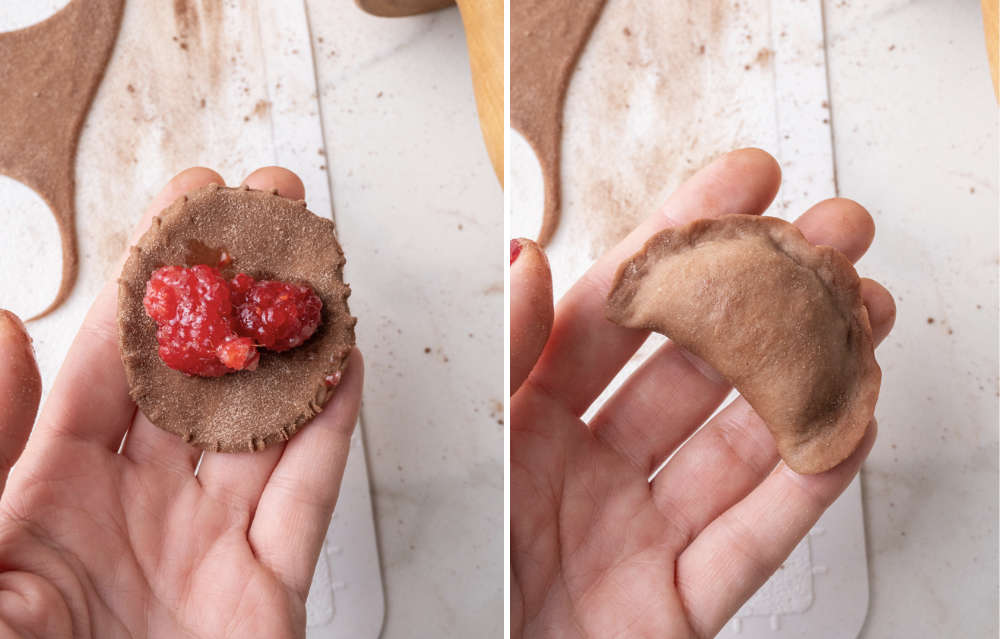
Place some of the filling on a round, do not use too much or the pierogi can be difficult to seal. If there is any liquid in the bowl, leave it behind.
Fold the dough over the filling to create a half-moon shape. Press edges together, sealing and crimping with your fingers. If the dough is sticky or some of the liquid from the filling makes the edges wet, just dip your fingers in flour or flour and cocoa and pinch the dough well.
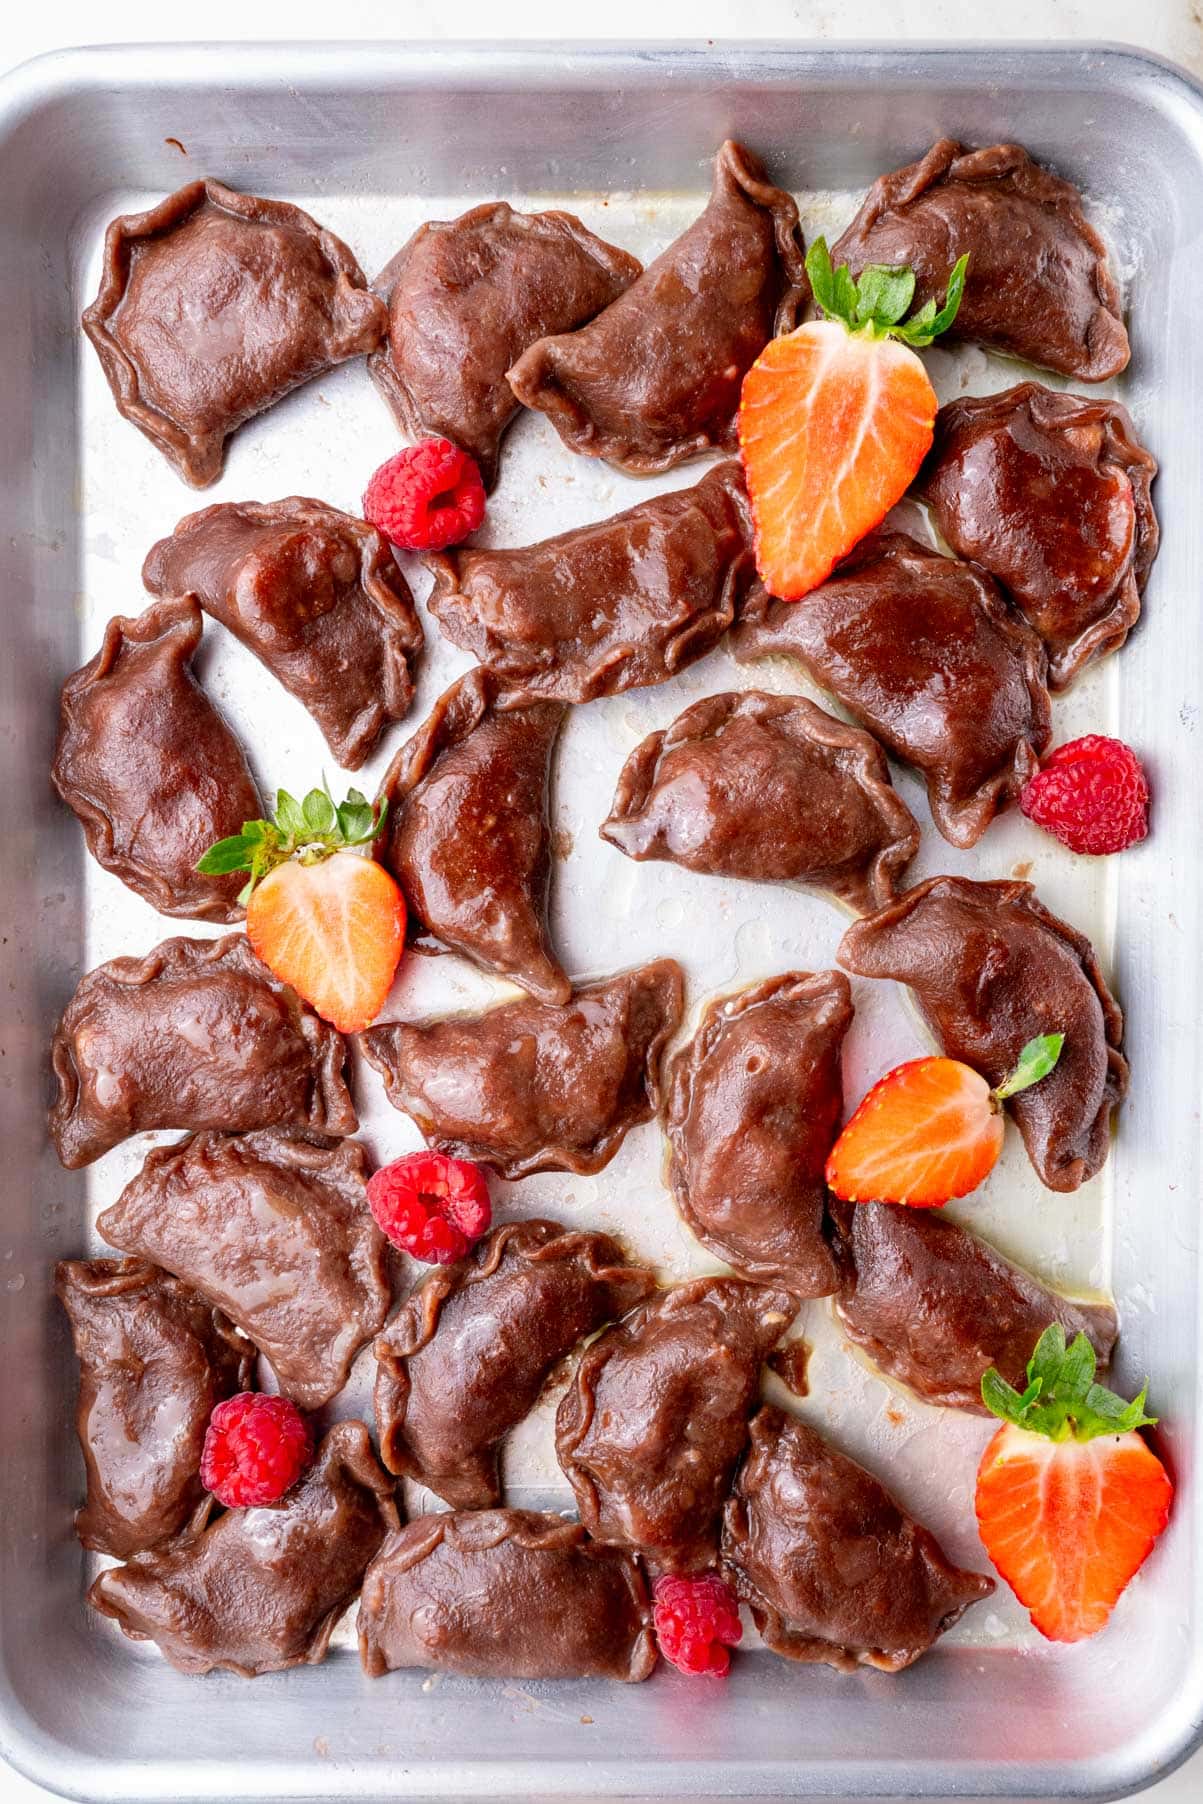
Place the pierogi apart on a surface sprinkled with a mixture of flour and cocoa powder.
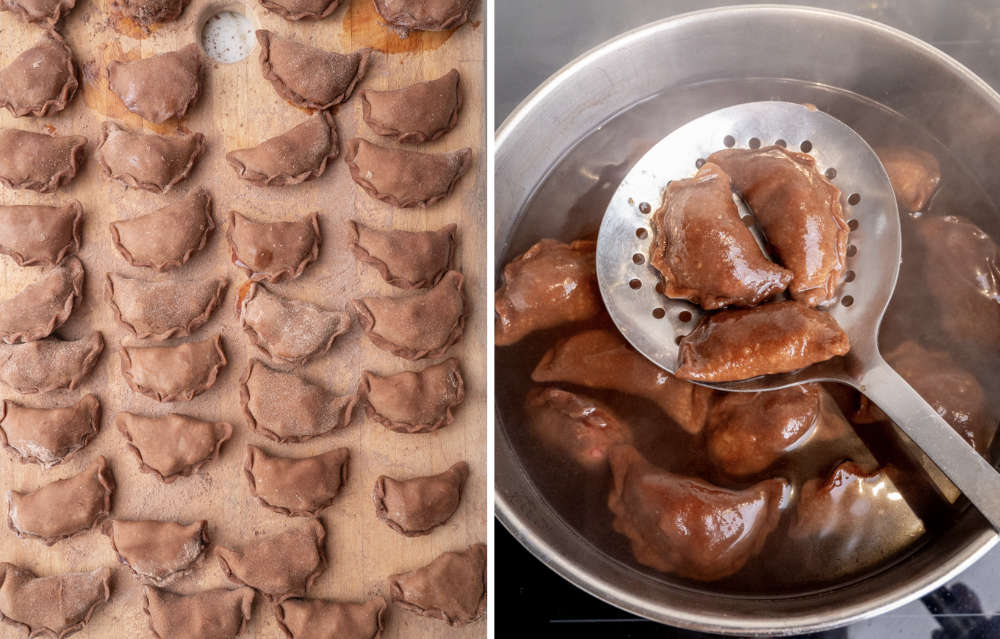
Repeat with the remaining dough. When you are halfway done, you may start cooking some of the pierogi (see instructions below).
Cook pierogi
Bring a large pot of salted water to a boil.
Cook the pierogi in batches, about 10–14 at a time, depending on their size and the size of your pot. Once they float to the surface, cook them for 1 minute, then remove them with a slotted spoon. If the dough is thicker, you may need to cook them for 2 minutes.
Avoid adding too many pierogi at once—if the water temperature drops too much, they may open up while cooking.
Drain well and transfer onto a plate. Pour over some melted butter so they won’t stick to each other.
I like to serve them with chocolate sauce, fresh berries, and whipped cream.
Enjoy!
For storage and freezing instructions go to this post (pierogi dough recipe) where you can find all the tips and tricks for making perfect pierogi along with a video showing the process!
Did you make this recipe? RATE THE RECIPE or tell me in the COMMENTS how you liked it! You can also add a photo of your dish. It would make me very happy and will help other readers. Thank you!!
Chocolate Pierogi

składniki
for the chocolate pierogi dough:
- 3 ½ cups (440g) all-purpose flour spooned and leveled, not scooped
- ⅓ cup (40g) powdered sugar
- ¼ cup (20g) cocoa powder
- 1 cup + 2 tablespoons (270g) water
- 3 tablespoons (42g) butter
- 1 teaspoon salt
fruit filling:
- 1 ⅓ pounds (600g) berries 5 cups halved raspberries or chopped strawberries (or both)
- ½ cup + 2 tablespoons (115g) granulated sugar
- 5 teaspoons corn starch
- 1 ½ tablespoons vanilla extract or vanilla sugar
OR raspberry and cheese filling (my preference):
- 3 cups (375g) halved raspberries
- 2 ¼ cups (345g) crumbled farmer’s cheese
- ¾ cup (150g) granulated sugar
additionally:
- you can also use chocolate hazelnut spread as a filling such as Nutella
- more flour and cocoa powder for working with the dough
- chocolate sauce to serve, optional
- whipped cream to serve, optional
- more fresh berries to serve, optional
Would you like to save this?
wykonanie
- If needed, please refer to the step-by-step photos in the body of the post or you can go to his (traditional) pierogi dough recipe post where I have a video showing the whole process of making pierogi.
Make the dough:
- Add the flour, powdered sugar, cocoa powder, and salt to a large mixing bowl and stir them together.
- In a small saucepan, warm the water with butter until they are very warm but not boiling (temperature should be around 176°F/80°C, that is when the water starts to move and steam).
- Pour hot water with butter into the bowl with flour, and mix with a wooden spoon until roughly combined.
- Knead the dough by hand or using a stand mixer fitted with a dough hook for about 5 minutes. You can also use a food processor with a dough blade. The dough should be smooth, soft, and not sticky—it will become even softer after resting. If you follow the recipe closely, especially if you weigh the ingredients instead of using measuring cups, the dough should turn out just right. However, if it feels too dry, add a little water; if it’s too wet, add a bit of flour until you reach the perfect consistency.
- Wrap the dough in plastic foil and leave to rest for about 40 minutes (don’t omit this step).
- In the meantime, you can wash the fruit and pat it dry with paper towels but don’t prepare the filling just yet – the sugar will start extracting water from the fruit, the fruit will get watery, and it will be difficult to stuff pierogi with watery filling!
Roll out the dough and cut out rounds
- Divide the dough into 3 parts.
- Onto a lightly floured surface or silicone rolling mat (you can also use a mix of flour and cocoa powder to roll the dough out), roll out thinly the first piece of the dough, to a thickness of approx. 1/8 inch or 3mm (or as thinly as you like).
- Use a cup or a pierogi/pastry cutter to cut out rounds.
- Gather scraps, cover with plastic wrap and set aside (I like to roll out the main parts of the dough by hand, using a rolling pin, and the scraps, which are harder to roll out, using pasta attachment on my kitchen aid, I’m using the setting 3).
Make the filling
- Make the filling: now you should make the filling, but don’t make all of the filling right away, the fruit starts to get watery really quickly. I like to quickly stir together 1 cup of fruit (halved raspberries or chopped strawberries) + 2 tablespoons sugar + 1 teaspoon of corn starch + ½ teaspoon of vanilla extract. I make more filling as I go and fill the pierogi. As for the raspberry and cheese filling, I like to make it in 3 batches, using 1 cup of raspberries, ¾ cup of crumbled farmer’s cheese, and ¼ cup of sugar. Then I make more when my pierogi are filled.
Filling and shaping pierogi
- Place some of the filling on a round, do not use too much or the pierogi can be difficult to seal. If there is any liquid in the bowl, leave it behind.
- Fold the dough over the filling to create a half-moon shape. Press edges together, sealing and crimping with your fingers. If the dough is sticky or some of the liquid from the filling makes the edges wet, just dip your fingers in flour or flour and cocoa and pinch the dough well.
- Place the pierogi apart on a surface sprinkled with a mixture of flour and cocoa powder.
- Repeat with the remaining dough. When you are halfway done, you may start cooking some of the pierogi (see instructions below).
Cook pierogi
- Bring a large pot of salted water to a boil.
- Cook the pierogi in batches, about 10–14 at a time, depending on their size and the size of your pot. Once they float to the surface, cook them for 1 minute, then remove them with a slotted spoon. If the dough is thicker, you may need to cook them for 2 minutes.
- Avoid adding too many pierogi at once—if the water temperature drops too much, they may open up while cooking.
- Drain well and transfer onto a plate. Pour over some melted butter so they won’t stick to each other.
- I like to serve them with chocolate sauce, fresh berries, and whipped cream.
- Enjoy!
uwagi
- If you want even more chocolate flavor, you can fill these pierogi with chocolate hazelnut spread like Nutella or a similar alternative. Just make sure the filling isn’t too runny, or it will be difficult to seal the pierogi properly. I wouldn’t make all the pierogi with a chocolate filling, as they might be too rich and heavy. However, a mix of chocolate-filled and fruit-filled pierogi is a great idea! This way, you get a nice balance of flavors and textures, making this dessert even more enjoyable.
- The number of pierogi you get from this recipe can vary. My pierogi are quite small, and I made about 70 pierogi from this batch. However, your yield may be different—you might get only half this amount if you make larger pierogi or roll the dough thicker. Keep this in mind when shaping your dumplings!
- How to measure flour: I’m using the “spoon and level method” so 1 cup of flour in my recipes weighs 125g. Fluff the flour by stirring it in the bag/flour container with a spoon. Spoon the flour and sprinkle it into your measuring cup. Sweep off the excess flour with the back of a knife. I recommend using a digital scale for perfect and consistent results.


2 komentarze
Barb
4 lutego 2025 o 23:13Can these chocolate pierogi be frozen?
Aleksandra
5 lutego 2025 o 15:36Yes, just like any other kind of pierogi. Place the pierogi apart on a floured baking sheet and freeze until solid. Transfer them to containers or plastic bags. Cook them like fresh pierogi (straight from the freezer) but remove from the pot them as soon as they float to the surface.